

It was not a completely trouble-free experience, the amount of plaster provided is not quite enough and does not allow for mistakes. Sure enough, we made a mistake on the first attempt, we waited too long between mixing the plaster and pouring it in the mold, and ended up with a mess. The solution was to go to the local store to buy a box of plaster of Paris, which allowed to make 2 volcanoes without worrying about running out.
After pouring the plaster and letting it set, the mold is taken apart to reveal the "cracked" surface of the volcano, which looks nice. The chimney remains inside, that's where the mix of soda and vinegar will go. That means the kit is not intended for making more than one volcano at a time. That was a small problem to address when making the second volcano, I cut out the spout of a water bottle and used it as the chimney for the other volcano. Worked well.
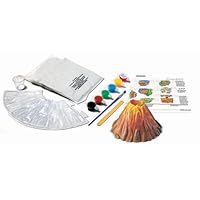
Once both volcanoes have hardened and dried, then came the arts part of the project: using the watercolor, make the while plaster look like a volcano. The colors include red, yellow, blue and green, and by mixing colors one can figure out how to make the desired colors. My mom and I had different styles, I went for a more authentic look with brown and green at the bottom, and orange "lava" at the top, and my mom went for a more hippie-looking volcano. They both looked great. The finished volcano is about 5 inches tall.
Since we were planning on filming and photographing the volcano eruptions, we did some experimenting with soda and vinegar in the sink using small glasses. We figured out the quantities we liked, and added some food coloring to make the lava orange instead of a white foam. The result was fantastic.
And then came the fun part: it was winter time in Canada, so we put the volcanoes on newspaper and the newspaper on the snow, took plenty of pictures (there were plenty of pictures at every step of the project as well), then proceeded with the eruptions. The whole family was outside to attend. They were spectacular, the lava erupted and flowed down the mountain...
We had a great time with this kit, and apart from the limited quantity of plaster it is good quality and well made. That would be a fun thing to do with kids, there are several skills involved in building and painting the volcanoes, and making them erupt.
Highly recommended.
Click Here For Most Helpful Customer Reviews >>
This is a great idea -a reusable mold for a reusable volcano, and it comes with everything except water and vinegar, easy enough. First, and only real complaint, the directions stink. They tell you to add a bottle for an enlarged eruption chamber after they told you to pour the plaster in the mold. Add the bottle first, then pour. Also, it is extremely difficult to get the plastic eruption chamber cylinder out after the mold has dried. It fell off the ring on our first try, and we had to break the mold to get it out. The second time, it fell down into the bottle, and we had to carve away a little bit of the volcano to get it out. There is nothing to grab onto. A loop with string molded into the bottom to pull it out would be great. The third time, it shifted a bit to the side, and was a PAIN to remove. It gets a bit damaged each time from stretching, pulling and poking, so I am not sure how long it will last. I see no reason it cannot be molded to the ring so it can be pulled out by the ring. On a minor note, the paint colors it comes with are inappropriate, but probably generic. White, yellow, green, red, blue and black. No brown? We mixed our own, but still. An awesome product to erupt once you finally get a complete, viable one.Best Deals for 4M Volcano Making Kit
Bought for my 3 and 4 year old boys. We made filled the mold and then watched the National Geographic documentary on volcanoes to keep them interested. Here are some notes that made our experience better:1. It is a 2-day project so tell kids in advance. Day one is making and setting the plaster in the mold; day two is for painting and eruptions.
2. Chamber rub Vaseline around all bits of the chamber so the plaster won't harden to it. It is a super easy solution that makes the chamber removable and thus reusable many times. (Remember in grade school covering your face with Vaseline to make a plaster mask for your parents? Right, same idea here.) After about 20 minutes simply give the chamber a tug and slide it out before the plaster completely dries and hardens (over night). The Vaseline keeps it from sticking.
3. Use twice the baking soda and vinegar as suggested or the eruption is underwhelming.
4. Use food color instead of paint in the chamber mixture. Paint doesn't dissolve as uniformly at all.
5. Remember it is a small mold roughly producing a 6" volcano so don't expect a centerpiece for your table. The smaller size, however, makes it extremely manageable! We set ours in an 8x8 baking pan for the eruptions for easy clean-up.
Good luck. The kit is a WONDERFUL value.
Honest reviews on 4M Volcano Making Kit
People need to read the manual! The volcano mold is filled with plaster while upsidedown.The confusion over the "eruption chamber" is that ONE plastic tube (with sealed bottom end to prevent the plaster from being poured into it) is included, and will become one with the plaster inside of the volcano--the area where you add your vinegar/baking soda later--therefore the tube/eruption chamber is not reusable.
The tube is basically the size of an 35mm film canister, and STAYS inside the volcano because the plaster won't allow it to budge once it is set. The volcano mold itself is reusable a zillion times, but you will need to come up with your own insert for the cavity (a plastic bottle neck with the cap on one end, an old 35mm film canister, even cardboard taped together like a 1 1/4" diameter tube will work).
Obviously the bigger the "chamber" the greater amount of "lava" may be used. Whatever you put in the top (small point) of the volcano to create the recess inside the volcano will stay there forever stuck to the plaster.
Plaster mixes quicker than oatmeal, and sets in 20 minutes, so no horsing around, or you will be at Michaels looking for more plaster.
I added a few pictures to the product page that may be more explanatory than what I've written here. Click the "View and share related images" link.
Find helpful customer reviews and review ratings for 4M Volcano Making Kit
I got this kit for my 41/2 yr old. We made the volcano today and it was a piece of cake. He loves it. We are waiting on it to dry so that we can paint it. Here are a few things to remember when you use this kit:1) The evolution chamber (the mixture of vinegar and baking soda goes in here) needs to go in first and then the mould goes around it.
2) After you pour the Plaster of Paris the evolution chamber stays inside (it is mentioned in the instructions). So the evolution chamber is not reusable. BUT we made ours reusable by inverting the volcano after it had dried half way through and then removing the evolution chamber mould. Now we can reuse the chamber again to make another volcano. But the instruction clearly states it is a one time use for the chamber. So make your volcano with caution
3) Some people have complained about not having brown color. There are clear instructions at the back as to how to mix different colors to get the desired colors. E.g. red+ yellow + little black = brown.

No comments:
Post a Comment